Introduction – The Skeleton of Your Experience
When you set out to build a new FPV drone, you’re faced with a dizzying array of choices for motors, flight controllers, and cameras. But before you get lost in those details, there is one decision that stands above all others, a choice that will fundamentally define the personality, limits, and purpose of your new quadcopter: the frame.
Think of the frame as the skeleton of your drone. It is the foundational structure that holds every other component together, but its importance goes far beyond that. The frame’s design dictates how your drone will feel in the air, how it will handle a crash, how easy it will be to build and repair, and what kind of flying it will excel at. Choosing the wrong frame can lead to a frustrating experience with poor performance and constant repairs. Choosing the right one is the key to unlocking a satisfying and thrilling flight experience.
This guide is designed to be your ultimate resource in making that choice. We’re going to answer the most important question: “How do I choose the right drone frame for *my* specific flying style?” We will move past the marketing hype and provide a deep, foundational understanding of *why* certain frames are perfect for racing, why others are built for cinematic video, and why some are designed to take a beating. From the basic anatomy of a frame to the subtle nuances of its geometry, you’re about to learn everything you need to know to select your next frame with confidence.
What is an FPV Drone Frame? The Foundation of Flight
At its core, an FPV drone frame is the structural backbone of your quadcopter. It’s the rigid chassis that serves as the mounting platform for every other piece of hardware, ensuring everything stays locked in place during high-speed maneuvers and the inevitable crash.
The Anatomy of a Modern Frame
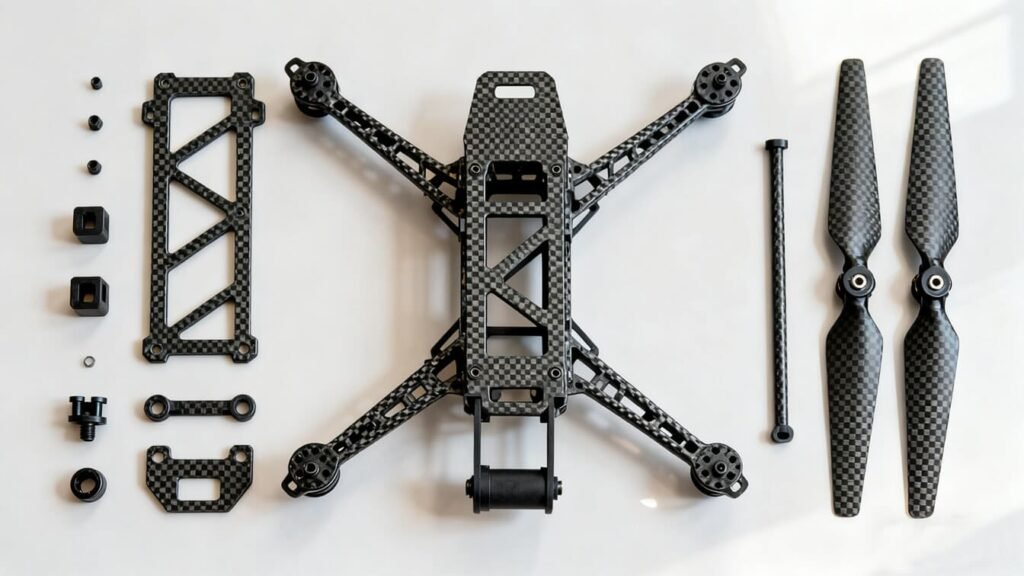
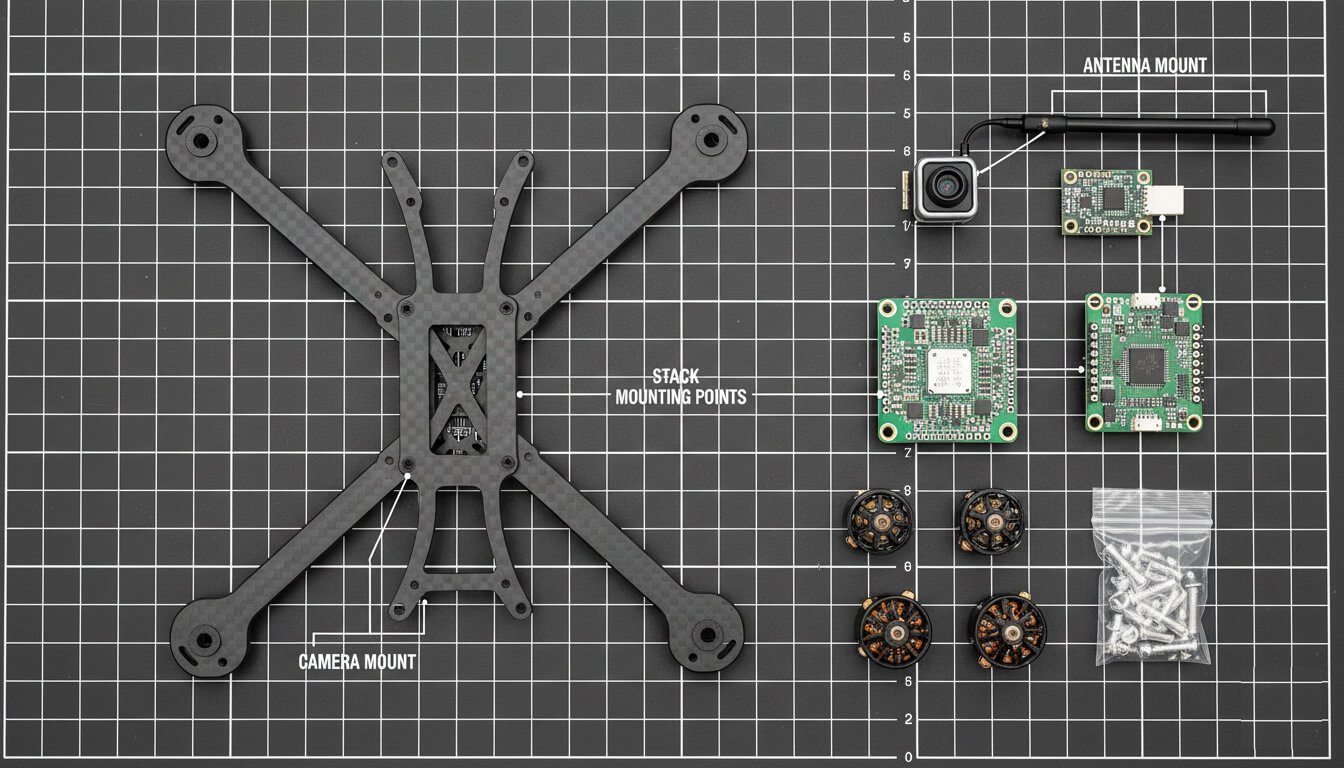
While designs can vary, most FPV frames you’ll encounter today are constructed from carbon fiber plates and metal hardware. A typical frame is composed of several key parts, each with a specific job:
- Arms (x4): These are the limbs of the drone where the motors are mounted. They bear the brunt of the forces during flight and are often the first point of impact in a crash, making their thickness and design critical for durability.
- Body (Top and Bottom Plates): This is the central “fuselage” of the drone. The bottom plate serves as the main structural base, while the top plate provides protection from above. The space between these plates is where you’ll house your sensitive electronics.
- Hardware (Standoffs and Bolts): These are the metal components that connect the top and bottom plates and hold the entire structure together. Standoffs are the cylindrical posts that determine the amount of vertical space you have inside the frame for your electronics stack.
- Camera Mount: This is a dedicated part of the frame, often made of carbon fiber, metal, or 3D-printed TPU, that holds your FPV camera securely at a desired angle.
More Than Just a Skeleton: The Impact on Performance
A common mistake for beginners is to think that all frames are more or less the same. In reality, the frame’s design has a massive influence on your drone’s flight characteristics. Even subtle changes in its geometry or weight distribution can have a noticeable effect. The frame’s rigidity, for example, directly impacts how well it handles vibrations. A flexible or “noodly” frame will be difficult to tune and can cause shaky video, while a stiff frame provides a stable platform for smooth flight. The frame’s shape affects its aerodynamics, influencing how it cuts through the air at high speed. It’s a mechanically simple component with a huge impact.
First, Define Your Mission: The Four Primary Flying Styles
The single most important factor in choosing a frame is to first understand what you want to do with your drone. In the world of FPV, there are four main disciplines, each with its own unique demands on the equipment.
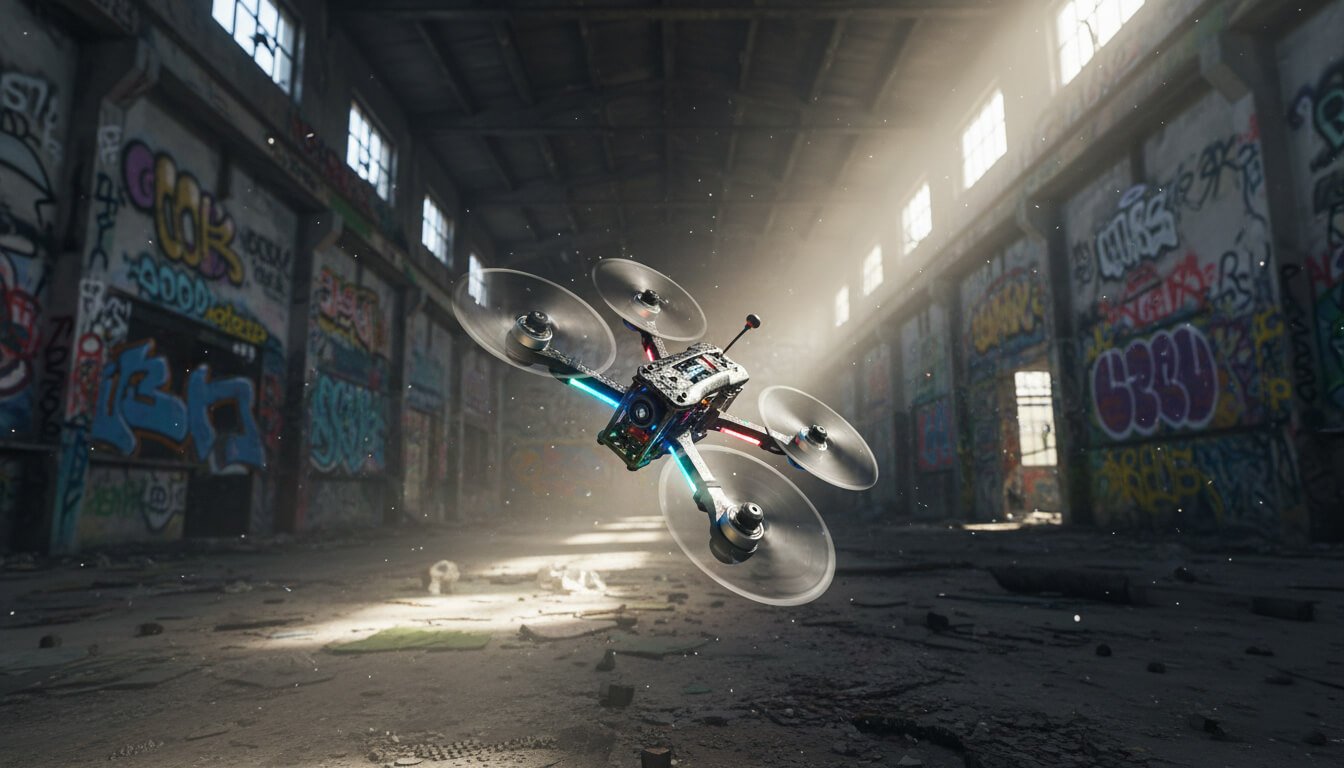
Freestyle: The Acrobat
- What is it? Freestyle flying is the art of FPV. It’s about performing fluid, acrobatic maneuvers like flips, rolls, dives, and power loops. Pilots often fly in dynamic environments like abandoned buildings (known as “bandos”), multi-story car parks, or open fields, focusing on creative expression and precise control.
- What a Freestyle Pilot Needs: The number one priority for a freestyle pilot is durability. Crashes are not a matter of if, but when. A good freestyle frame must be a tank, able to withstand repeated impacts against concrete, trees, and steel. It also needs to be well-balanced for predictable handling during tricks and have good options for mounting an HD camera like a GoPro to record the action.
Racing: The Speed Demon
- What is it? Just as it sounds, FPV drone racing involves competing against other pilots on a designated track marked with gates, flags, and other obstacles. The singular goal is to complete the course in the fastest time possible.
- What a Racer Needs: For a racing pilot, two things matter above all else: being lightweight and aerodynamic. Every gram of weight and every bit of air resistance slows you down. Racing frames are therefore minimalist, stripped-down designs with skinny arms and a compact profile to minimize drag. Durability is often sacrificed for pure performance.
Cinematic: The Floating Camera
- What is it? Cinematic FPV is about using the drone as a flying camera to capture smooth, sweeping, professional-looking video. This can range from slow, graceful flights through a forest to high-speed proximity flying alongside a moving car.
- What a Cinematic Pilot Needs: The absolute top priority is an unobstructed camera view. This means the frame must be designed in a way that the propellers are never visible in the recorded footage. The frame must also be incredibly stable and good at damping vibrations to produce “jello-free” video. Specialized frames known as “Cinewhoops,” which have protective ducts around the propellers, are also very popular in this category for flying safely near people and objects.
Long-Range: The Explorer
- What is it? Long-range flying is about pushing the limits of distance and flight time to explore breathtaking landscapes. This involves flying for several miles over mountains, along coastlines, or deep into remote areas.
- What a Long-Range Pilot Needs: The frame must prioritize efficiency and have plenty of space. Long-range builds require larger, more efficient propellers, big batteries for extended flight time, and extra components like a GPS module for navigation and safety. The frame needs to accommodate all of this comfortably while remaining stable for cruising.
The Technical Deep Dive: Deconstructing the Drone Frame
Now that you’ve identified your mission, let’s break down the technical specifications of a frame. Understanding these details will allow you to look at a product description and know exactly how that frame is likely to perform.
Frame Size: Wheelbase and Propeller Compatibility
The size of a drone frame is its most fundamental characteristic. It is typically described in two ways:
- Wheelbase: This is the precise diagonal distance from the center of one motor to the center of the motor diagonally opposite it, measured in millimeters (mm).
- Propeller Size: More commonly, pilots refer to a frame’s size by the maximum propeller size it can support, measured in inches. So, when you hear someone talk about a “5-inch frame,” they mean a frame designed to run 5-inch propellers.
Choosing the right prop size is crucial. The propellers are what generate thrust, and you generally want to use the largest propeller a frame can support to maximize its efficiency and performance. Running smaller props on a larger frame is a bad idea; the drone will have a larger moment of inertia (a tendency to resist changes in rotation), which will make it feel sluggish and unresponsive.
Detailed Size Chart with Recommendations
This table provides a general guide to matching frame size with its intended purpose.
| Frame Size (Prop) | Typical Wheelbase (mm) | Recommended Flying Style(s) | Key Characteristics |
|---|---|---|---|
| 2″ – 3″ | 90 – 150 | Indoor, Small Parks, “Cinewhoop” | Lightweight, agile, safe for tight spaces, short flight times. |
| 4″ | 150 – 180 | Lightweight Long-Range, Micro Freestyle | Very efficient, quiet, great for exploring smaller areas. |
| 5″ | 180 – 220 | The All-Rounder: Freestyle, Racing | The best balance of power, agility, and part availability. |
| 6″ | 220 – 250 | Freestyle, Efficient Cruising | More stable and efficient than 5″, but less responsive. |
| 7″+ | 280+ | True Long-Range, Heavy Payloads | Maximum stability and flight time, carries large batteries. |
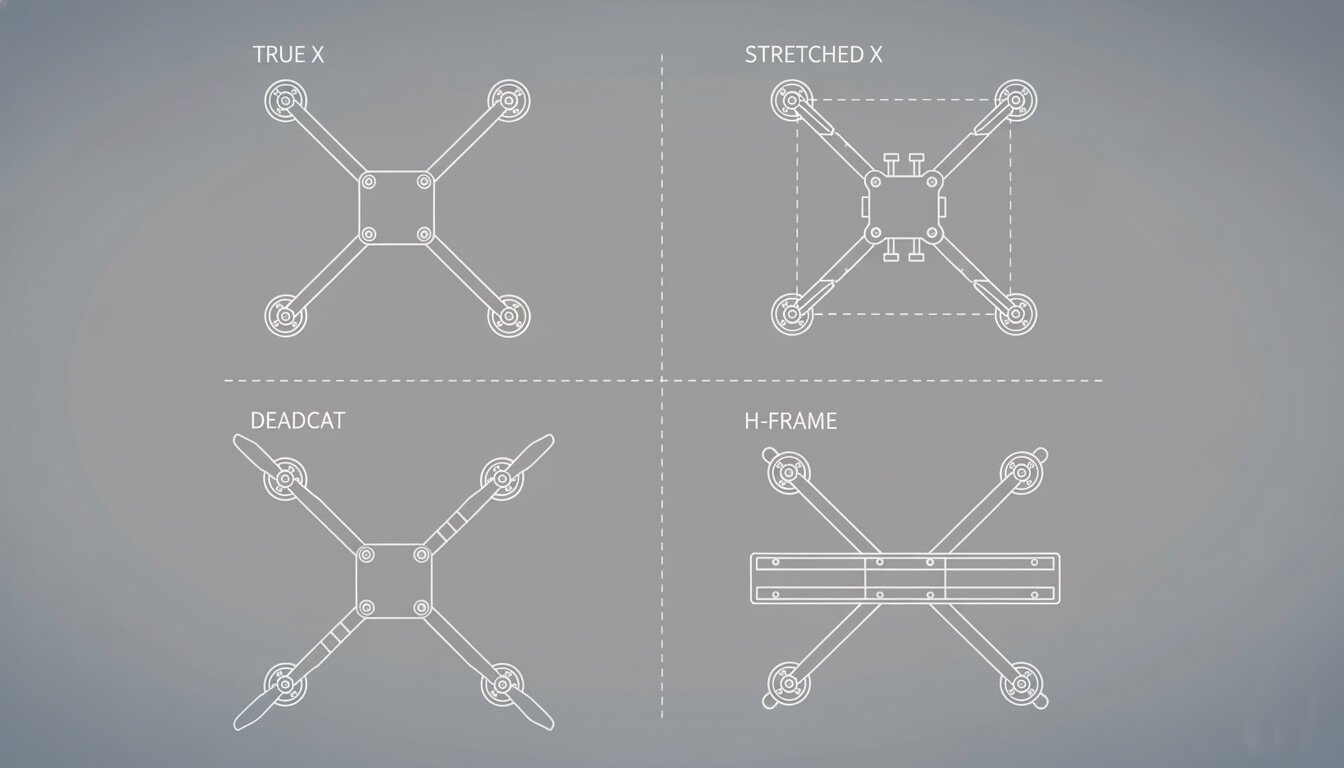
Frame Geometry (Layout): The Shape of Performance
The arrangement of the arms creates the frame’s geometry, which has a subtle but definite impact on how the drone feels in the air.
- True X: This is a perfectly symmetrical layout where the distance between all motors is equal.
- Pros: It offers perfectly balanced and consistent control on both the pitch (front-to-back) and roll (side-to-side) axes. This makes it feel very predictable, which is great for acrobatic maneuvers.
- Cons: The front propellers are often visible in the FPV camera view.
- Best for: Freestyle, Racing.
- Stretch X: This is an X frame that has been “stretched” so it’s longer from front to back than it is wide.
- Pros: This design improves stability at high forward speeds. The extra separation between the front and rear props also means the rear props are flying in “cleaner,” less turbulent air, which can improve handling in fast turns.
- Cons: It can feel slightly less responsive on the roll axis.
- Best for: Racing.
- Deadcat: This is an asymmetrical layout where the front arms are shorter and swept back at a wider angle than the rear arms.
- Pros: Its one and only purpose is to provide a completely unobstructed camera view, with no propellers in the shot.
- Cons: The asymmetrical motor layout can introduce some minor unwanted yaw when you roll, though modern flight controller software is very good at compensating for this. The front of the drone is also more exposed in a crash.
- Best for: Cinematic, Long-Range.
Construction: Unibody vs. Replaceable Arms
This refers to how the arms are integrated into the main body of the frame, and it’s a major factor in repairability.
- Unibody: In this design, the four arms and the main bottom plate are all cut from a single, solid piece of carbon fiber.
- Pros: This design is lighter because it requires less hardware (screws and press nuts) and is generally simpler to assemble.
- Cons: This is a big one. If you break an arm in a crash, you must replace the *entire* main plate. This is not only more expensive but also means you have to move all four motors and your electronics stack to the new plate—a lot of work!
- Replaceable Arms: Here, each arm is a separate piece of carbon fiber that is bolted onto a central body, usually sandwiched between two smaller bottom plates.
- Pros: The advantage is obvious: if you break an arm, you can simply unbolt it and replace it with a new one in minutes. This is much cheaper and faster.
- Cons: The extra hardware required adds a bit of weight to the frame.
The Verdict: For any pilot who expects to crash—which is nearly everyone in freestyle and racing—a frame with replaceable arms is overwhelmingly the preferred choice for its superior serviceability.
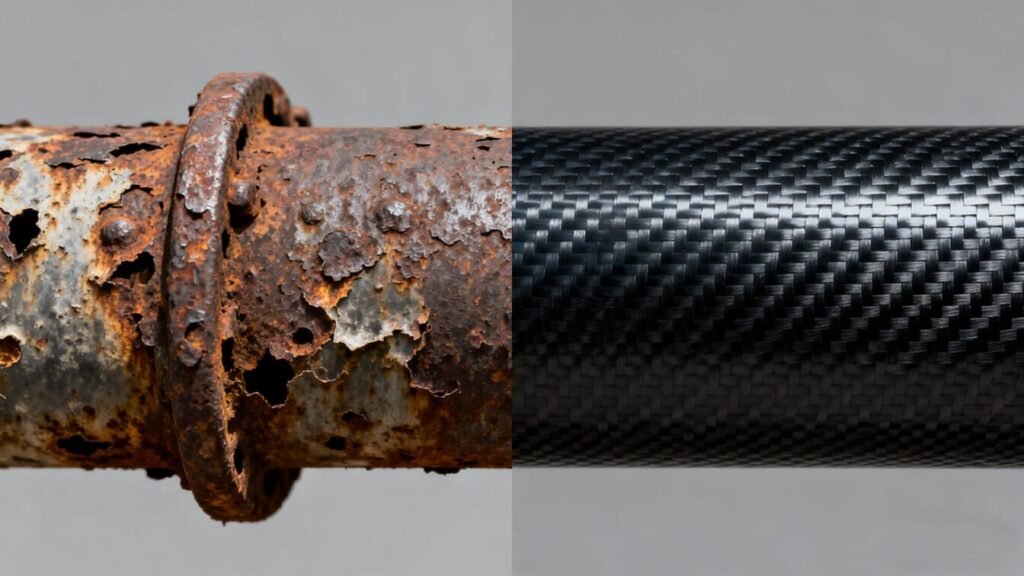
Material Science: Carbon Fiber and Hardware
Almost all modern FPV frames are made from carbon fiber, but the quality of that carbon and the thickness of the plates are what truly determine a frame’s durability.
- Carbon Fiber Quality: Unfortunately, there’s no easy way to judge the quality of carbon fiber just by looking at it. Cheaper frames from unknown brands often use lower-grade carbon that can delaminate or snap easily. Your best bet is to stick with reputable brands known for their quality and to check reviews from trusted pilots.
- Arm Thickness: This is a key specification and a good indicator of a frame’s intended purpose and durability. Thicker arms are stronger but heavier.
Frame Size (Prop) Recommended Minimum Arm Thickness 3″ 3mm 4″ 4mm 5″ 5mm (or 6mm for aggressive freestyle) 7″ 6mm – 8mm
The Builder’s Checklist: Ensuring Component Compatibility
You’ve found a frame that matches your flying style and looks great. But before you click “buy,” you must ensure that all your other components will actually fit. Nothing is more frustrating than discovering your flight controller doesn’t line up with the mounting holes. Here is a comprehensive checklist.
| Component | What to Check | Common Standards / Notes |
|---|---|---|
| Flight Controller / ESC Stack | Check the mounting pattern on the frame’s body. | 30.5×30.5mm (Standard), 20x20mm (Mini), 25.5×25.5mm (Whoop-style AIO). Most 5″ frames support both 30.5mm and 20mm. |
| FPV Camera | Check the supported camera width. | Nano (14mm), Micro (19mm), DJI Digital sizes (20mm). Ensure the frame includes the correct mount or adapter. |
| Motors | Check the motor mounting hole pattern on the arms. | Most 5″ motors use a 16x16mm or 19x19mm pattern. Make sure the arm ends are wide enough and have the right holes. |
| HD Camera (e.g., GoPro) | Does the frame have a dedicated mounting solution? | Many freestyle frames have mounting holes on the top plate for a 3D-printed TPU mount. Check if a mount is included or available. |
| VTX and Antenna | Is there a good spot for your VTX and a secure mount for its antenna? | The rear of the frame is a common spot. A solid antenna mount is crucial to prevent damage in a crash. |
Battery Mounting: Top Mount vs. Bottom Mount
This is a major design choice that affects both practicality and flight characteristics.
- Top Mount: The battery is strapped to the top plate.
- Pros: This is the preferred method for freestyle. It protects the battery, which is the most expensive and fragile component, from hard landings. It also places the drone’s center of mass closer to the line of the propellers, which can make acrobatic maneuvers feel more balanced and responsive.
- Cons: It can make it crowded to also mount an HD camera on the top plate.
- Bottom Mount (Underslung): The battery is strapped underneath the bottom plate.
- Pros: This frees up the entire top plate for a clean HD camera setup, making it the standard for cinematic flying. It also creates a lower vertical profile, which can reduce drag, making it popular with some racers.
- Cons: The battery is the first thing to hit the ground on every landing, leading to more wear and tear.
From Theory to Purchase: A Decision Framework
Feeling overwhelmed? Don’t be. Let’s synthesize all this information into a simple, step-by-step process for choosing your perfect frame.
The Flying Style Cheat Sheet
Start here. Identify your primary flying style, and this table will give you the most common and effective specifications to look for.
| Flying Style | Recommended Size | Recommended Geometry | Key Frame Priorities |
|---|---|---|---|
| Freestyle | 5″ or 6″ | True X, Wide X | Durability, Replaceable Arms (min. 5-6mm thick), Top Battery Mount, Good GoPro Mount. |
| Racing | 5″ | Stretch X, True X | Lightweight, Aerodynamic Profile, Rigidity, Replaceable Arms. |
| Cinematic | 3″ (Cinewhoop), 5″ | Deadcat | No Props in View, Low Vibration, Secure HD Camera Mounting, Bottom Battery Mount. |
| Long-Range | 4″ (Micro), 7″+ | H-Frame, Deadcat | Ample Space for Components, Efficiency-focused design, GPS Mount. |
Consider Your Budget and Skill Level
If you’re a beginner, you are going to crash. A lot. Therefore, your first priority should be durability and ease of repair. It makes far more sense to start with a tough, affordable freestyle frame with easily replaceable arms than to buy an ultralight, expensive racing frame that will shatter on the first hard impact. Look for popular frames with a strong community following; this means spare parts will be easy to find and there will be plenty of build guides and videos online to help you.
Expert Tips and Final Checks
The Importance of Chamfered Edges
When you’re looking at a frame’s product photos, pay close attention to the edges of the carbon fiber. High-quality frames will have chamfered (beveled or rounded) edges. This isn’t just a cosmetic touch to make the frame feel nice in your hand. A sharp, 90-degree edge on carbon fiber is a weak point that can easily delaminate or split in a crash. It can also act like a knife, slicing through battery straps or motor wires from vibration over time. Chamfering is a mark of quality manufacturing that significantly improves a frame’s durability.
The Clone vs. Original Debate
In the FPV hobby, you will often find cheap “clones” of popular frame designs. While the low price is tempting, it’s important to understand the trade-offs. Designing and testing a new frame is a long and expensive process for the original creator. Cloners skip this R&D and often use lower-grade carbon fiber that looks the same but is far less durable. Whenever possible, supporting the original designer not only gets you a higher quality product but also helps sustain the innovation that drives our hobby forward.
Conclusion – Your Build Starts Here
Choosing a drone frame is a journey of balancing a series of exciting trade-offs: weight versus durability, agility versus stability, performance versus cost. There is no single “best” frame that conquers all categories. The perfect frame is the one that is perfectly aligned with your goals as a pilot.
By first taking a moment to define your flying style, you can transform an overwhelming wall of options into a clear and logical path. You now have the knowledge to filter through the specifications, to understand what size, geometry, and construction will serve you best, and to select a frame that will be more than just a chassis. It will be a reliable partner in the air. Now, it’s time to start planning your build, and get flying!
FAQ (Frequently Asked Questions)
Q1: What is the best FPV drone frame for a beginner?
The best frame for a beginner is almost always a 5-inch Freestyle frame with a True X geometry and replaceable arms. These frames are designed to be extremely durable, making them forgiving of the inevitable learning crashes. They are also well-balanced, easy to fly, have plenty of space inside for an easy first build, and are cheap and simple to repair when you break an arm.
Q2: Can I use a racing frame for freestyle, or vice-versa?
Absolutely! There are no strict rules. However, you will be making significant trade-offs. If you fly aggressive freestyle with an ultralight racing frame, you risk breaking it much more easily. On the other hand, if you try to race with a heavier, bulkier freestyle frame, you will be noticeably slower and less agile than your competitors who are using purpose-built racing frames.
Q3: What’s the difference between a frame’s wheelbase and its size in inches?
Wheelbase is the precise physical measurement from the center of one motor to the center of the diagonally opposite motor, measured in millimeters. The size in inches (e.g., “5-inch”) is a more common shorthand that refers to the largest size propeller the frame is designed to use. While they are directly related (a 5-inch frame typically has a wheelbase around 220mm), referring to the prop size is the most practical way to categorize a frame.
Q4: What are “chamfered edges” and why do they matter?
Chamfered edges are the rounded or beveled edges on the carbon fiber plates of a frame. A sharp, 90-degree edge is a weak point that can easily split, chip, or delaminate in a crash. It can also act like a blade and cut into wires or battery straps over time. Chamfering removes this weak point, making the frame significantly more durable. It is a key indicator of a high-quality frame.
Q5: Is a unibody frame stronger than a frame with separate arms?
It’s a complex trade-off. A unibody frame can be very strong as impact forces are distributed across a single large piece of carbon. However, a well-designed frame with separate arms often creates an even more rigid central “box” where the arms are sandwiched between two plates. For most pilots, the practical benefit of being able to quickly and cheaply replace a single broken arm makes the separate-arm design the superior choice in terms of long-term durability and cost-effectiveness.
Q6: Why do some frames have the battery on the bottom instead of the top?
This is a design choice based on the pilot’s priorities. Top-mounting the battery is standard for freestyle because it protects the expensive battery during landings and can improve acrobatic handling. Bottom-mounting (or “underslung”) is standard for cinematic flying because it clears the top plate for a clean GoPro shot, and it’s also popular with racers who want the lowest possible vertical profile to reduce air resistance.